Create Pricing Tables with Tabulizer
Creating pricing tables with Tabulizer is easy as 1-2-3.
Step 1: Select the ruleset for your pricing table.
A ruleset is a set of rules that specify the styling aspects of the table, plus other features. You can select an existing ruleset or build your own. In this tutorial we will use an existing one that is part of the Pricing Tables - Collection 1 ruleset archive that you can download from here. Once you have download it, you need to import it with the option "YES, overwrite safemode settings." checked, as it contains modification functions that require your explicit permission.
Here is a preview of the contained rulesets that you should be able to see if you click on the preview link: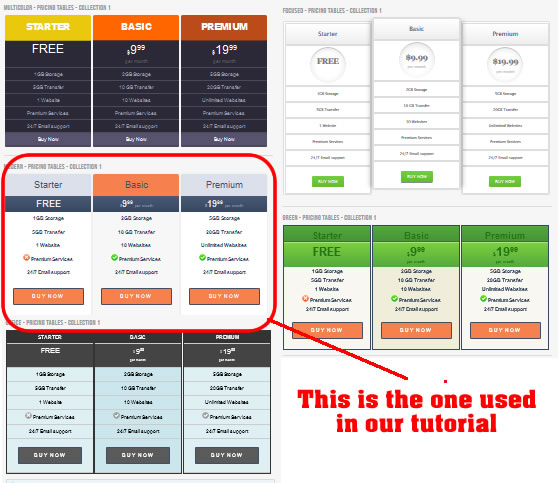
Step 2: Enter you table data
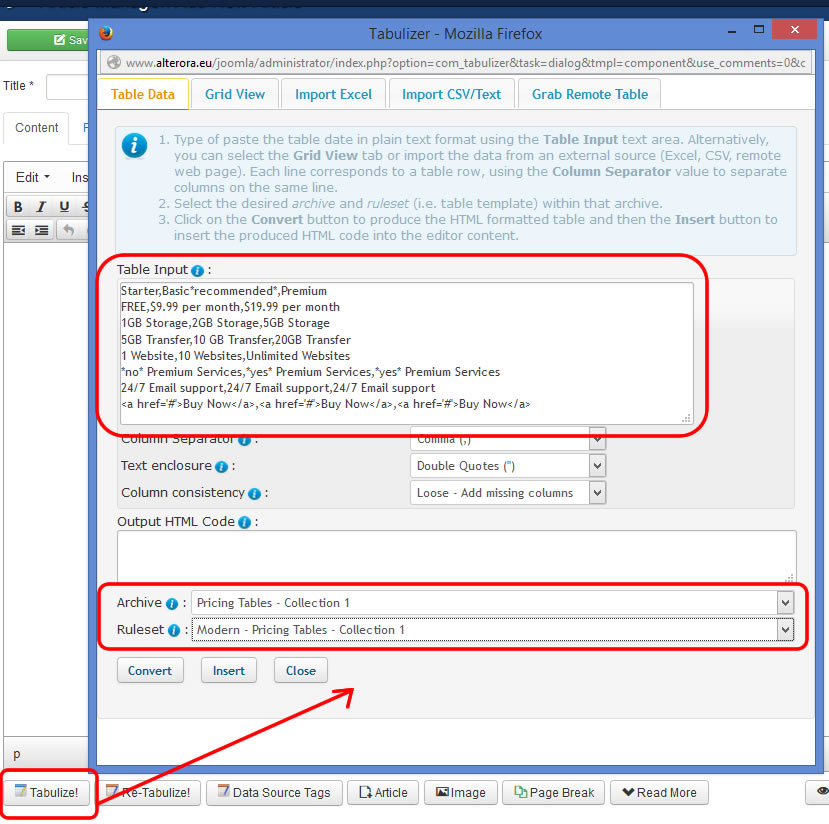
The table data can be entered only once, via the popup Tabulizer window, or dynamically via a data source which will link the pricing table with an external source, like a database, an Excel file and so on. In this example we will use the popup window because it's easier to demonstrate.
OK, let's type the following data:
Starter,Basic*recommended*,Premium
FREE,$9.99 per month,$19.99 per month
1GB Storage,2GB Storage,5GB Storage
5GB Transfer,10 GB Transfer,20GB Transfer
1 Website,10 Websites,Unlimited Websites
*no* Premium Services,*yes* Premium Services,*yes* Premium Services
24/7 Email support,24/7 Email support,24/7 Email support
<a href='#'>Buy Now</a>,<a href='#'>Buy Now</a>,<a href='#'>Buy Now</a>
Each line corresponds to a table row, which each column is separated with a comma (there could be either columns separators as well). On top of that, there are some other implicit rules that you should follow in order to achieve the desired end result. The following paragraphs describes these rules that are specific to this particular ruleset. Other rulesets may have other rules.
This collection contains some popular responsive pricing tables that can be used in your site to compare offered plans or products. The cool thing about these rulesets is that almost everything is done automatically if you follow these simple rules:
- The first table row should contain the title of the product/service/plan
- The second line should contain its price, using this format:
currency symbol price period or other notes. Example:
$19.99 per month
Alternative, you can specify a list of other labels that can be used instead of a specific price, such as FREE or TRIAL. You can edit the modification rule for ptc1convert to add more text values. - If you want to highlighted/suggest a plan use the keyword *recommended* along its title. E.g. $19.99 per month *recommended*. The keyword will be removed and the selected column will be styled differently.
- If you want to add YES or NO icons, just use the keywords *yes* and *no*
- The action link should be placed at the bottom row, i.e. the buy now or sign up hyperlink code.
- You can have as many rows and columns.
Step 3: Create the table and preview it in the front-end
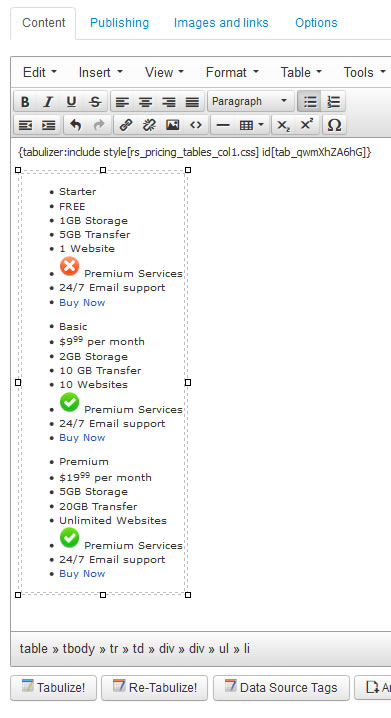
Once you have entered the table data, we selected the desired ruleset and we click on the Convert button. This will produced the HTML code that can add into our article by clicking on the Insert button.
In the backend it should look like this:
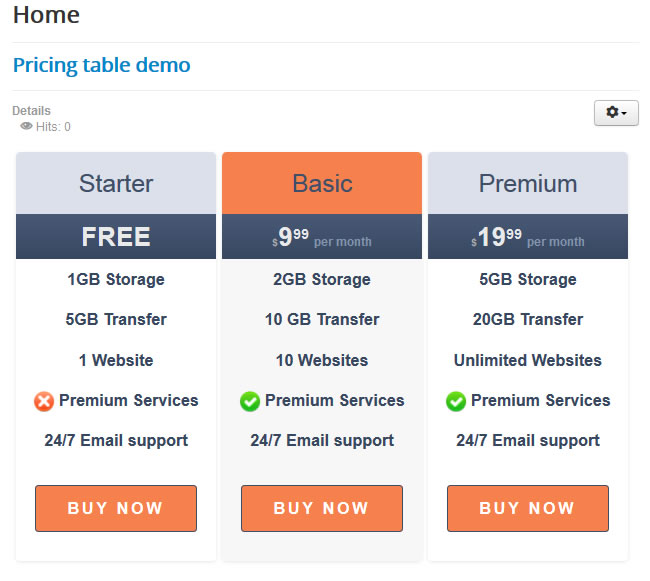
Here how it should look like in the front-end: